환경설정이 다 됐으니 기본적인 프론트 작업 시작!
기본적인 프론트 + 백엔드를 다 해놓고 웹으로 배포하면서 핸드폰으로 돌아다니면서 데이터를 저장하려고 한다.
그렇다면 오늘 목표는
1. 기본 프론트 잡기
2. 가게 정보 백엔드 로직 짜기
3. 저장된 DB 가져오는 로직 짜기
로 정해놓고 시작!
1️⃣ 프론트 (React + Vite)
간단한 헤더를 추가하고 그 밑에 지도가 배치되게 했다.
지도가 메인인 상태에서 내 위치 찾기 버튼, 데이터 저장 부분으로 나눴다.
일단 화면 좌측 아래에 내 위치 버튼을 뒀다.
이번에도 지도는 카카오 지도 사용!
프로젝트에 .env라는 환경 변수 파일을 만들어서 거기서 kakaomap key를 추가했다.
🎯여기서 알게 된 포인트!
CRA로만 리액트 프로젝트를 설정할땐 REACT_APP_ 이런식으로 설정하지만
Vite로 설정할 땐 앞에 VITE를 붙여줘야 한다!
REACT_APP_KAKAOMAP_KEY= "KEY"		//React
VITE_REACT_APP_KAKAOMAP_KEY= "KEY"	//Vite
useEffect(() => {
const apiKey = import.meta.env.VITE_REACT_APP_KAKAOMAP_KEY;
loadKakaoMapScript(
apiKey,
() => {
if (window.kakao && window.kakao.maps) {
getUserLocation(
(position) => {
const { latitude, longitude } = position.coords;
const map = initializeMap("map", latitude, longitude);
mapRef.current = map;
const markerOverlay = createCustomOverlay(map, latitude, longitude);
markerRef.current = markerOverlay;
map.setCenter(new window.kakao.maps.LatLng(latitude, longitude));
startTracking();
},
(error) => {
console.error("위치 가져오기 실패:", error.message);
}
);
}
},
() => {
console.error("Kakao Maps API 스크립트 로드 중 오류 발생");
}
);
}, []);
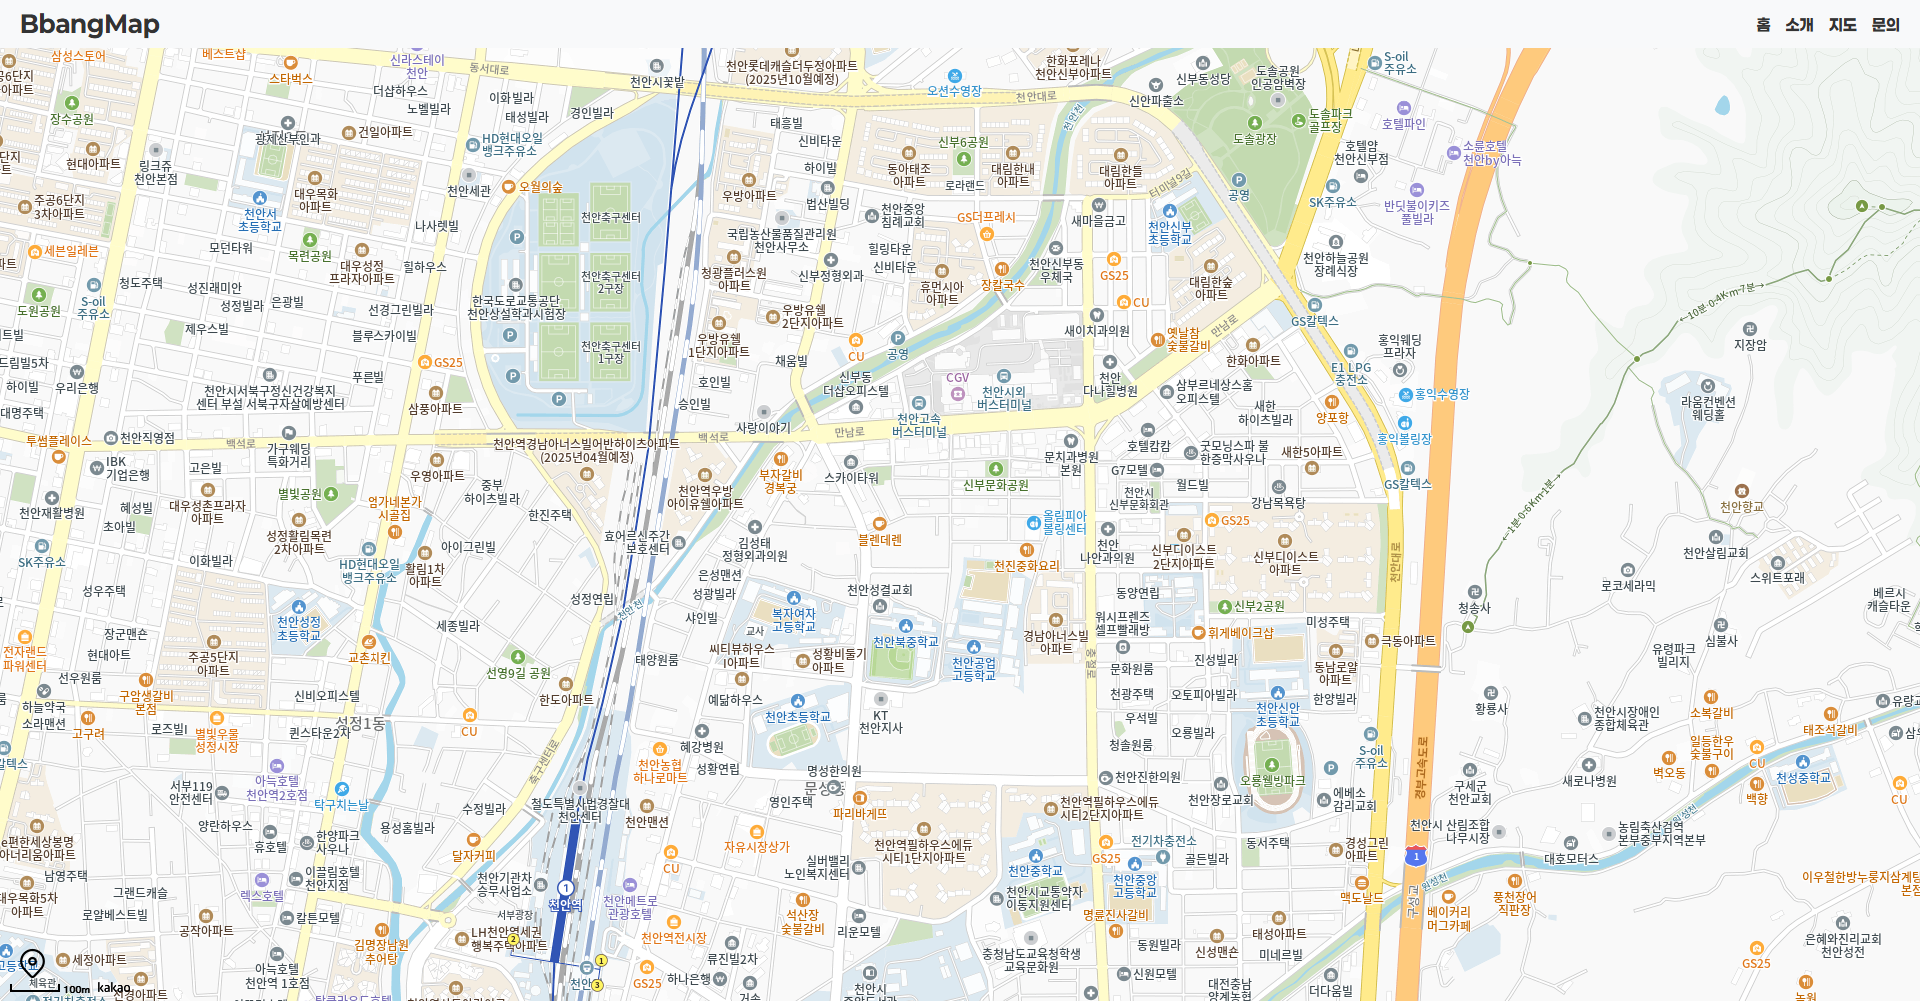
그 다음으로는 geolocation을 이용해서 사용자한테 위치 정보를 제공받고, 현재 위치를 커스텀 마커로 표시하게 했다.
그리고 만들어둔 내 위치 버튼을 통해 내 위치 버튼을 누르면 현재 위치로 지도 중심을 이동하게 했다.
커스텀 마커에는 내 위치를 시각적으로 쉽게 알 수 있게 파란색 원을 계속 나타나게 CSS 처리했다.
(3차 프로젝트때 누가 잘 만들어둔게 있어서 그대로 쓰기만 하면 돼서 편했어요!)
export const getUserLocation = (onSuccess, onError) => {
  if (navigator.geolocation) {
    navigator.geolocation.getCurrentPosition(onSuccess, onError);
  } else {
    onError({
      code: "NOT_SUPPORTED",
      message: "이 브라우저에서는 위치 정보를 지원하지 않습니다.",
    });
  }
};

export const createCustomOverlay = (map, latitude, longitude) => {
  const { kakao } = window;

  const markerContent = document.createElement("div");
  markerContent.className = "custom-marker";

  markerContent.innerHTML = `
    <div class="radar-effect"></div>
    <img
      src="https://ssl.pstatic.net/static/maps/m/pin_rd.png"
      class="location-icon"
      alt="현재 위치">
  `;

  const markerOverlay = new kakao.maps.CustomOverlay({
    position: new kakao.maps.LatLng(latitude, longitude),
    content: markerContent,
    map: map,
    zIndex: 1,
  });

  return markerOverlay;
};
radar-effect {
position: absolute;
width: 50px;
height: 50px;
border-radius: 50%;
background: rgba(0, 150, 255, 0.3);
animation: radar 1.5s infinite linear;
}
@keyframes radar {
0% {
transform: scale(1);
opacity: 0.7;
}
100% {
transform: scale(2.5);
opacity: 0;
}
}
  const handleMyLocationClick = () => {
    const map = mapRef.current;

    if (!map) {
      alert("지도 객체를 찾을 수 없습니다.");
      return;
    }

    const { lat, lng } = currentPosition;

    if (lat && lng) {
      const newCenter = new window.kakao.maps.LatLng(lat, lng);
      map.setCenter(newCenter);

      if (markerRef.current) {
        markerRef.current.setPosition(newCenter);
      } else {
        const marker = new window.kakao.maps.Marker({
          position: newCenter,
          map: map,
        });
        markerRef.current = marker;
      }
    } else {
      alert("현재 위치 정보를 가져올 수 없습니다.");
    }
  };
다음으로는 내 위치가 이동될 때 마다 새롭게 마커 위치를 업데이트 되게 구현했다.
  const startTracking = () => {
    if (navigator.geolocation) {
      navigator.geolocation.watchPosition(
        (position) => {
          const { latitude, longitude } = position.coords;

          setCurrentPosition({ lat: latitude, lng: longitude });

          if (markerRef.current) {
            markerRef.current.setPosition(
              new window.kakao.maps.LatLng(latitude, longitude)
            );
          }
        },
        (error) => {
          console.error("위치 추적 실패:", error.message);
        },
        { enableHighAccuracy: true, maximumAge: 0 }
      );
    } else {
      console.error("이 브라우저는 Geolocation API를 지원하지 않습니다.");
    }
  };
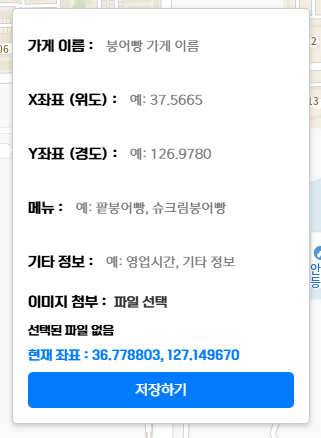
이렇게 기본적인 틀을 잡고 이제 데이터를 저장할 입력 폼 부분을 만들었다.
가게 이름, x/y, 메뉴, 기타 정보들, 이미지 첨부(가게 사진) 이렇게 기본적인 정보들을 저장할 수 있게 했다.
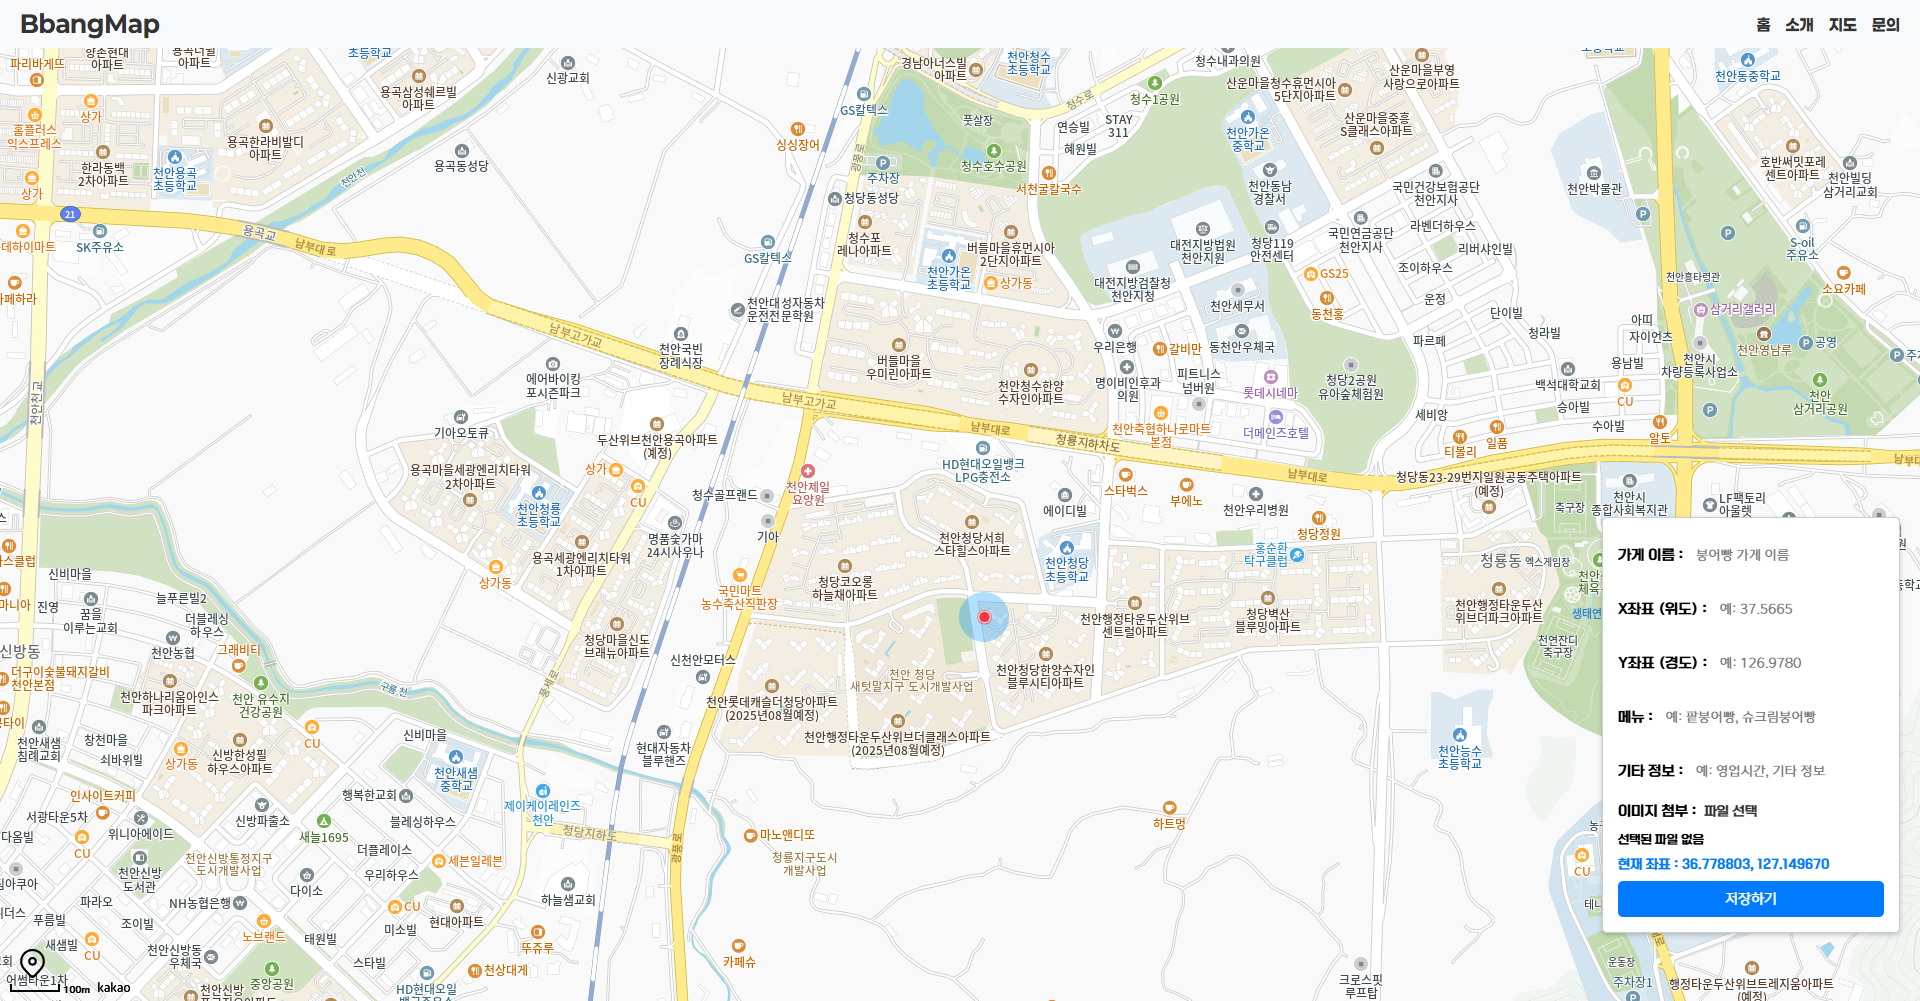
좌표는 알 수 없기 때문에 현재 좌표가 실시간으로 나오게 구성했다.
최종적으로 저장하기 누르면 클라이언트에서 axios 요청을 통해 서버로 전달!
이미지는 BLOB 으로 데베에 저장되게 했다.
🎯포인트!
React에서 사용하고 있는 file 타입의 input은 기본 CSS 스타일이 적용되어 있는데 이걸 className을 주고 따로 CSS해도 적용이 되질 않는다. 그래서 따로 span으로 custom-file-button라는 className을 줘서 해당 span을 클릭하면 숨겨둔 파일 첨부 버튼이 클릭되게 했다.
원래는 해당 span을 클릭하면 onClick={handleButtonClick}이 실행돼서 숨겨진 첨부 버튼이 클릭되게 했었는데
그럴때마다 파일 첨부 창이 2번씩 뜨는 문제가 발생됐다.
그 이유는 label에 for 속성이 없는 경우, label을 클릭하면 기본적으로 포함된 input 요소를 트리거 하기 때문이였다.
그래서 그냥 span으로 커스텀 파일 첨부를 두고 기본 input type = file은 display:none으로 숨겨두고 같은 label로 묶었다.
최종적으로 저장하기 버튼을 누르면 입력된 데이터들은 axios를 통해 서버로 넘겨지게 구현했다.
  <form className="inputDB" onSubmit={handleFormSubmit}>
    <label>
      가게 이름 :
      <input
        type="text"
        name="storeName"
        value={formData.storeName}
        onChange={handleChange}
        placeholder="붕어빵 가게 이름"
        required
      />
    </label>
    <label>
      X좌표 (위도) :
      <input
        type="text"
        name="storeX"
        value={formData.storeX}
        onChange={handleChange}
        placeholder="예: 37.5665"
        required
      />
    </label>
    <label>
      Y좌표 (경도) :
      <input
        type="text"
        name="storeY"
        value={formData.storeY}
        onChange={handleChange}
        placeholder="예: 126.9780"
        required
      />
    </label>
    <label>
      메뉴 :
      <input
        name="storeMenu"
        value={formData.storeMenu}
        onChange={handleChange}
        placeholder="예: 팥 붕어빵, 슈크림 붕어빵"
      />
    </label>
    <label>
      기타 정보 :
      <input
        name="storeInfo"
        value={formData.storeInfo}
        onChange={handleChange}
        placeholder="예: 영업시간, 기타 정보"
      />
    </label>
    <label>
      이미지 첨부 :

      <span
        className="custom-file-button"
        // onClick={handleButtonClick}
      >
        파일 선택
      </span>

      <input
        type="file"
        ref={fileInputRef}
        className="hidden-file-input"
        onChange={(e) => {
          handleFileChange(e);
          setSelectedFileName(e.target.files[0]?.name || "선택된 파일 없음");
        }}
      />
    </label>
    <span className="file-name">{selectedFileName}</span>
    <div className="current-coordinates">
      현재 좌표 : {" "}
      {currentPosition.lat && currentPosition.lng
        ? `${currentPosition.lat.toFixed(6)}, ${currentPosition.lng.toFixed(6)}`
        : "위치 정보를 가져오는 중..."}
    </div>
    <button type="submit">저장하기</button>
  </form>
axios를 통한 데이터들 전송, 저장하기 버튼 후 입력 필드 초기화
const handleFormSubmit = async (e) => {
    e.preventDefault(); // 기본 폼 동작 방지

    try {
      const requestData = new FormData();
      requestData.append("storeName", formData.storeName);
      requestData.append("storeX", formData.storeX);
      requestData.append("storeY", formData.storeY);
      requestData.append("storeMenu", formData.storeMenu);
      requestData.append("storeImage", formData.storeImage);
      requestData.append("storeInfo", formData.storeInfo);

      const response = await apiClient.post("/fishstore", requestData, {
        headers: { "Content-Type": "multipart/form-data" },
      });

      alert("가게 정보가 저장되었습니다!");
      console.log("저장된 데이터:", response.data);

      setFormData({
        storeName: "",
        storeX: "",
        storeY: "",
        storeMenu: "",
        storeImage: null,
        storeInfo: "",
      });

      if (fileInputRef.current) {
        fileInputRef.current.value = "";
      }

    } catch (error) {
      console.error("데이터 저장 실패:", error);
      alert("서버로 데이터 전송에 실패했습니다. 다시 시도해주세요.");
    }
  };
2️⃣ 백엔드 (Spring boot + JPA)
✅ DB에 저장하기
이제 받은 값들을 서버에서 처리해서 데이터베이스에 저장되게 해야 한다.
백엔드 설정은 sts3에서 Spring boot 기반으로 구현했으며, DB와의 상호작용은 JPA를 통해 처리했다.
(어떤게 맞는 방법인지 몰라서 배운대로 1차 프로젝트 때 리액트를 spring boot로 백엔드 구현한것과, 3차 프로젝트 때 JPA를 접해봐서 이렇게 구성했다.)
✔️Controller
Axios 요청을 통해 들어온 값들을 controller에서 처리하게 했다.
axios를 통해 formdata로 데이터를 전송한 것들을 RequestParam을 통해 받았다.
메뉴랑 정보 사진은 없는 경우가 있을수도 있으니 required = false를 통해 파라미터가 없어도 될 경우도 설정했다.
MultipartFile을 통해 이미지 파일에 대한 처리를 했다. 이미지 파일은 BLOB 형태로 DB에 저장되게 했다.
이렇게 처리한 데이터들을 service에 전달!
@RestController
@RequestMapping("/fishstore")
public class FishstoreController {

    @Autowired
    private FishstoreService service;

    @PostMapping
    public ResponseEntity<FishstoreEntity> saveFishstore(
            @RequestParam("storeName") String storeName,
            @RequestParam("storeX") Double storeX,
            @RequestParam("storeY") Double storeY,
            @RequestParam(value = "storeMenu", required = false) String storeMenu,
            @RequestParam(value = "storeInfo", required = false) String storeInfo,
            @RequestParam(value = "storeImage", required = false) MultipartFile storeImage) {

        FishstoreEntity savedFishstore = service.saveFishstore(storeName, storeX, storeY, storeMenu, storeInfo, storeImage);
        return ResponseEntity.ok(savedFishstore);
    }
}
✔️Service(interface)
어떤 메서드를 사용할지 정의하기
public interface FishstoreService {
    FishstoreEntity saveFishstore(String storeName, Double storeX, Double storeY, String storeMenu, String storeInfo, MultipartFile storeImage);
}
✔️ServiceImpl(구현체)
파일을 byte 배열로 바꾸고 FishstoreEntity를 생성해서 해당 엔티티의 필드에 저장하게 구현했다.
그러고 repository.save(fishstore)를 통해 fishstore의 객체를 분석해서 매핑된 테이블에 SQL INSERT 쿼리를 생성한다.
저장된 엔티티의 필드에 대한 값들이 저장!
@Service
public class FishstoreServiceImpl implements FishstoreService {

    @Autowired
    private FishstoreRepository repository;

    @Override
    public FishstoreEntity saveFishstore(String storeName, Double storeX, Double storeY, String storeMenu, String storeInfo, MultipartFile storeImage) {
        byte[] imageBytes = null;

        try {
            // MultipartFile을 byte[]로 변환
            if (storeImage != null && !storeImage.isEmpty()) {
                imageBytes = storeImage.getBytes();
            }
        } catch (Exception e) {
            throw new RuntimeException("이미지 변환 중 오류 발생: " + e.getMessage());
        }

        FishstoreEntity fishstore = new FishstoreEntity();
        fishstore.setStoreName(storeName);
        fishstore.setStoreX(storeX);
        fishstore.setStoreY(storeY);
        fishstore.setStoreMenu(storeMenu);
        fishstore.setStoreInfo(storeInfo);
        fishstore.setStoreImage(imageBytes);

        return repository.save(fishstore);
    }
}
✔️Entity
@Entity
@Data
public class FishstoreEntity {

    @Id
    @GeneratedValue(strategy = GenerationType.IDENTITY)
    private Long id;

    @Column(nullable = false)
    private String storeName;

    @Column(nullable = false)
    private Double storeX;

    @Column(nullable = false)
    private Double storeY;

    @Column(length = 500)
    private String storeMenu;

    @Column(length = 1000)
    private String storeInfo;

    @Lob // BLOB으로 설정
    private byte[] storeImage;
}
✔️Repository
@Repository
public interface FishstoreRepository extends JpaRepository<FishstoreEntity, Long> {
}
최종 프론트 + 백엔드 상태
(웹으로 서비스 할때는 실제 내 위치가 다르게 한참 떨어진 곳으로 잡힌다. 폰으로 확인할때가 더 정확하다.)

이미지도 BLOB으로 잘 들어오는거 까지 확인!
이제 이 저장된 값들을 화면에 출력하게 하면 될 것 같다.
✅ DB값 출력하기
이제 저장된 값들을 JPA 레포지토리의 findAll()을 통해 가져오면 된다.
✔️Controller
GetMapping을 통해 serviceImpl의 service.getAllFishstores()을 호출!
@GetMapping
public ResponseEntity<List<FishstoreEntity>> getAllFishstores() {
    List<FishstoreEntity> fishstores = service.getAllFishstores();
    return ResponseEntity.ok(fishstores);
}
✔️Service(interface)
public interface FishstoreService {

    List<FishstoreEntity> getAllFishstores();

}
✔️Service(구현체)
BLOB라는 바이너리 데이터를 텍스트 문자열로 인코딩 하기 위해 Base64를 사용했다.
클라이언트랑 서버간 데이터 전달을 JSON으로 하고 있기 때문에 byte[]는 사용할 수 없다. 이걸 문자열인 base64로 바꿔야 한다.
@Service
public class FishstoreServiceImpl implements FishstoreService {

    @Autowired
    private FishstoreRepository repository;

    @Override
    public List<FishstoreEntity> getAllFishstores() {
        List<FishstoreEntity> fishstores = repository.findAll();

        for (FishstoreEntity store : fishstores) {
            if (store.getStoreImage() != null) {
                // byte[] 데이터를 Base64 문자열로 변환
                String base64Image = Base64.getEncoder().encodeToString(store.getStoreImage());
                store.setStoreImageBase64("data:image/jpeg;base64," + base64Image);
            }
        }

        return fishstores;
    }

}
✔️Entity
엔티티에 이미지 처리할 부분을 추가했다.
storeImage가 BLOB로 되어있어서 JSON으로 직렬화 하면 문제가 생길 수 있기 때문에, 이를 방지하고 클라이언트로 응답 시 Base64 문자열(storeImageBase64)만 보내기 위해 JsonIgnore 어노테이션을 사용했다.
또 storeImageBase64라는 Base64로 변환된 문자열을 저장하는 임시 필드를 추가했다. 그리고 데이터베이스에 저장되지 않게
Transient 어노테이션을 사용했다.
@Entity
@Data
@Table(name = "fishstore")
public class FishstoreEntity {

    @Id
    @GeneratedValue(strategy = GenerationType.IDENTITY)
    private Long id;

    @Column(nullable = false)
    private String storeName;

    @Column(nullable = false)
    private Double storeX;

    @Column(nullable = false)
    private Double storeY;

    @Column(length = 500)
    private String storeMenu;

    @Column(length = 1000)
    private String storeInfo;

    //이미지 처리 추가
    @Lob
    @JsonIgnore
    private byte[] storeImage;

    @Transient
    private String storeImageBase64;
}
✔️Repository
레포지토리는 그대로!
@Repository
public interface FishstoreRepository extends JpaRepository<FishstoreEntity, Long> {
}
그 후 클라이언트에서 처음 지도 설정할 때 get요청을 /fishstore에 보내서 가게 데이터들을 가져왔다.
배열로 가져온 데이터에 저장된 x,y값을 이용해서 붕어빵 마커를 지도에 생성!
붕어빵 마커 클릭 시 카카오 지도 API에서 제공하는 kakao.maps.event.addListener를 이용해서 저장된 값을 출력했다.
  useEffect(() => {
    const apiKey = import.meta.env.VITE_REACT_APP_KAKAOMAP_KEY;

    loadKakaoMapScript(
      apiKey,
      () => {
        if (window.kakao && window.kakao.maps) {
          getUserLocation(
            (position) => {
              const { latitude, longitude } = position.coords;

              const map = initializeMap("map", latitude, longitude);
              mapRef.current = map;

              const markerOverlay = createCustomOverlay(map, latitude, longitude);
              markerRef.current = markerOverlay;

              map.setCenter(new window.kakao.maps.LatLng(latitude, longitude));

              startTracking();

              // 서버에서 가게 데이터 가져오기
              apiClient
                .get("/fishstore")
                .then((response) => {
                  const fishstores = response.data;
                  console.log("가게 데이터:", fishstores);

                  addStoreMarkers(fishstores, map);
                })
                .catch((error) => {
                  console.error("가게 데이터를 가져오는 중 오류 발생:", error);
                });
            },
            (error) => {
              console.error("위치 가져오기 실패:", error.message);
            }
          );
        }
      },
      () => {
        console.error("Kakao Maps API 스크립트 로드 중 오류 발생");
      }
    );
  }, []);
const addStoreMarkers = (fishstores, map) => {
markersRef.current.forEach(marker => marker.setMap(null));
markersRef.current = [];
fishstores.forEach((store, index) => {
const markerPosition = new window.kakao.maps.LatLng(store.storeX, store.storeY);
const imageSrc = "public/images/markerlogo.png";
const imageSize = new window.kakao.maps.Size(40, 40);
const markerImage = new window.kakao.maps.MarkerImage(imageSrc, imageSize);
const marker = new window.kakao.maps.Marker({
position: markerPosition,
map: map,
image: markerImage,
zIndex: 30,
});
markersRef.current.push(marker);
const overlayContent = document.createElement("div");
overlayContent.className = "bbangstore";
overlayContent.innerHTML = `
<div class="storeinfo-container">
<strong class="storeinfo-name">${store.storeName}</strong><br />
<span class="storeinfo-menu">메뉴: ${store.storeMenu || "정보 없음"}</span><br />
<span class="storeinfo-info">정보: ${store.storeInfo || "정보 없음"}</span><br />
${
store.storeImageBase64
? `<img src="${store.storeImageBase64}" alt="${store.storeName}" style="width:100px;height:100px;" />`
: ""
}
</div>
`;
const customOverlay = new window.kakao.maps.CustomOverlay({
position: markerPosition,
content: overlayContent,
yAnchor: 1.3,
zIndex: 30,
});
window.kakao.maps.event.addListener(marker, "click", () => {
customOverlay.setMap(map);
});
overlayContent.addEventListener("click", () => {
customOverlay.setMap(null);
});
});
};
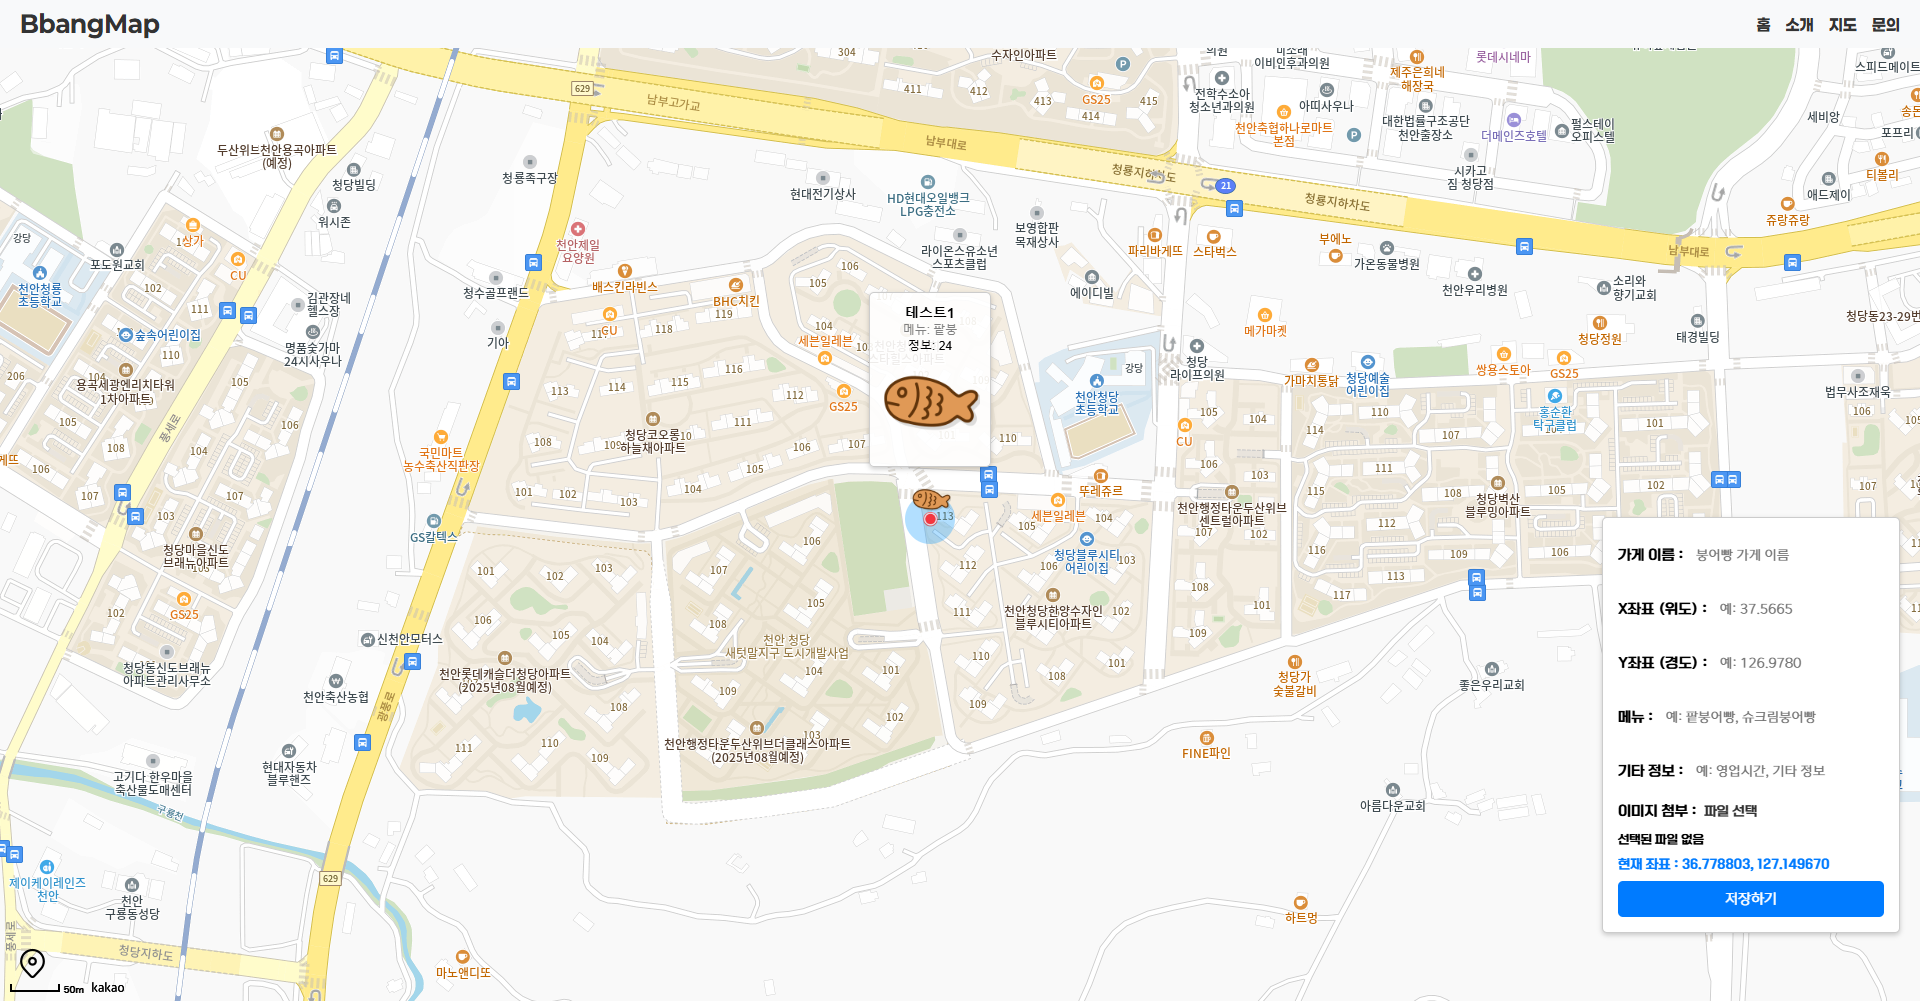
일단 이렇게 저장하고 출력하고까지는 된 것 같다!
이제 어떻게 저장된 값을 어떻게 분류할건지, 어떤 값들을 중점으로 저장되고 출력할건지 더 생각해 봐야 한다.
또 좌표 뿐만 아니라 도로명 주소와 길 찾기, 로드뷰 등 더 많은 기능들을 추가해야한다.
그리고 최종적으로는 웹으로 프론트 + 백엔드까지 가능하게 배포해서 실제로 돌아다니면서 저장이 가능하게 구현해야 한다!
에어팟 케이스랑 키링을 샀는데 너무 귀여워서 여기다가 투척하기,,
'Develop > React' 카테고리의 다른 글
| 붕어빵 프로젝트 업데이트 v0.2 (1) | 2024.12.18 |
|---|---|
| 붕어빵 프로젝트 업데이트 v0.1 (1) | 2024.12.17 |
| 붕어빵 지도 프로젝트 도메인으로 배포하기 (2) (1) | 2024.12.15 |
| 붕어빵 지도 프로토타입 (1) | 2024.12.13 |
| 붕어빵 지도 만들기! (0) | 2024.12.12 |


